The discovery of a new dish does more for the happiness of mankind than the discovery of a star. -- Anthelme Brillat-Savarin --
Showing posts with label Cookies. Show all posts

Monday, July 3, 2017

Fun Stuff for the Fourth of July - Watermelon Slice Cookies

HOWDY!  Just wanted to pop in and share a fun recipe for the 4th of July!  I've made these several times, and they never fail to receive rave reviews.  They take a little effort, but they're really yummy and lots of fun.

I found this recipe called Watermelon Slice Cookies many years ago, in a copy of Taste of Home magazine.  They've published it several times since in various cookbooks, and even another edition of their magazine.  You can find the recipe by clicking here.


Believe it or not, I really haven't tweaked this one much, so I won't repost the entire recipe here.  The only things I've done differently, are:
  1. Rather than 1/2 tsp. almond extract, I use 1/4 tsp. almond extract and 1/4 tsp. vanilla (I've also made them with vanilla only when I found myself out of almond extract once.  They're delicious either way.)
  2. ALWAYS double the recipe so you'll have plenty of them.   (With the effort it takes to make them, you won't want to start over for the second batch!)
  3. I like cutting the cookies into wedges rather than halves (they're super cute, and you get more cookies this way!).
Give this recipe a try, you're sure to impress, and you'll be glad you made the extra effort.

And...when you try them, don't forget to tell me know what you think of them!

As I celebrated the 4th of July with at least 4 generations of my family this past weekend, I was reminded once again how grateful I am to live in a country where we can get together to celebrate the many freedoms we are blessed with - including the freedom to worship, pray and play together.  I don't take lightly the sacrifices made by so many men & women (and their families) to ensure that those freedoms continue.  I hope you don't either.

Blessings,
--Faithy


Monday, May 5, 2014

Happy Cinco de Mayo!!

HOWDY!
Just thought I'd pop in and revisit my Cinco de Mayo Cookie recipe.  They're colorful, festive and fun to make, not to mention yummy.  It's also fun to get reactions from folks when you tell them the ingredients!  LOL!

You can find the recipe on my earlier blog post by clicking on this LINK!

May your day be filled with joy overflowing!!
Blessings,
--Faithy

Saturday, December 21, 2013

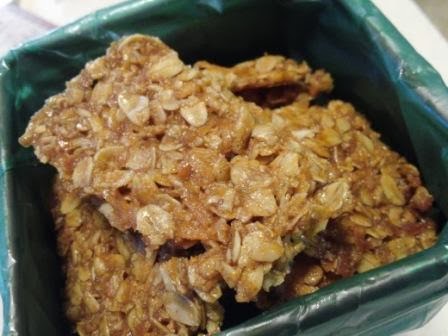
Oatmeal Brittle


HOWDY friends!  Wow…can’t believe it’s only a few days until Christmas!  Yikes…where does the time go?  I’ve been busy in my kitchen all day today, preparing Christmas goodies for my friends and family.  In addition to some of my “tried & true” holiday recipes, I decided to try a few new ones as well.  I spent a good bit of the day testing various cookie brittle recipes, and out of the four I tried, this one is far & away my favorite!

It is so unbelievably quick & easy, that I knew I just had to share the recipe with you, in case you’re looking for something yummy to throw together for a great gift or party food.  It’s
a buttery, crunchy, delicious treat, AND…it’s gluten free!

I found the recipe online over at Anna’s “Cookie Madness” blog site, and I am sooooooo glad I did.  I will definitely be making this one again, as it has now been added to my “tried & true” favorites list!

I only made minimal adaptations (using Karo“Lite” Syrup in place of regular light corn syrup, and adding some cinnamon).  I also took it out of the oven a few minutes early and “scored” it with a pizza cutter, then returned it to the oven for the last few minutes.

Anyway, here’s the recipe…go make some tonight!


Oatmeal Brittle

1 stick (1/2 cup) unsalted butter, melted
1 Tablespoon light corn syrup (I used Karo “Lite” Syrup)
1/2 cup light brown sugar, packed
1/4 teaspoon salt
1 teaspoon vanilla
1/4 teaspoon baking powder
1-3/4 cups oats (I used old-fashioned oats…NOT the quick cooking type)
1/3 cup sweetened, flaked coconut
1/2 teaspoon ground cinnamon (this was not in the original recipe, but I thought it added a nice flavor)

Preheat oven to 325°F, and while it’s heating, line a 13x18” rimmed baking sheet with parchment paper.  (I sprayed my parchment paper with cooking spray, and brushed it with a pastry brush to make sure it covered the entire paper.  After the fact, I don’t think it was really necessary.  There is so much butter in this cookie that it probably wouldn’t stick anyway!)

In a large bowl, stir together the butter, corn syrup, brown sugar, salt, vanilla and baking powder.  Add the oats and coconut and stir until thoroughly mixed.

Spread the mixture as thinly as possible across the baking sheet. (NOTE:  The mixture is VERY sticky, and will stick to anything you use - including fingers - making it hard to spread unless you use a well-greased utensil.  I used a large spatula coated with non-stick cooking spray, and it worked very well.)


Bake for about 15 minutes or until the edges are just starting to brown.  Remove from the oven and score with a pizza cutter.  (This will make it easier to break after it has cooled.)  


Return to the oven for an additional 5 minutes or until the edges are nice and brown.

Remove from oven and slide the parchment paper of the hot pan and directly onto a large cooling rack.  (I have a nice large one, but you could also use two smaller ones placed side by side.)  Let cool completely.  When cool, the cookie will be very crisp.  Break into pieces along the scored lines and enjoy!

NOTE:  If you find that your cookie is not crisp enough when you try to break it (that probably means that you didn’t get it thin enough), just slide the parchment back onto the baking sheet and return it to the oven (at a lower setting - about 250°F), and allow it to crisp up a bit.  Then return it to the cooling rack and let it cool again.


I couldn’t resist tasting this stuff while it was still warm and a bit chewy.  It was delicious that way too!
I can’t wait to share this yummy stuff with my friends and family.  I’m sure they’ll love it as much as I do, and I’m sure you will too!

Let me know if you try it, and stop by “Cookie Madness” and tell Anna thanks for the delicious recipe!!
Gotta run…I still have lots to do in preparation for Christmas!

I pray that you and yours will have a holiday filled with good food, lots of laughter, precious memories, and a joyous celebration of the birth of our Savior, Jesus Christ!!

Blessings,
--Faithy

Monday, October 7, 2013

Gig’em (Red Velvet) Cookies

Now that football season is in full swing, I thought I'd share one of my favorite cookie recipes.    I found my base recipe years ago in a book called Carrot Cake Murder by Joanne Fluke.  She called them Red Velvet Cookies, but I like my name better.  (Hee, hee...just a little tribute to my Fightin' Texas Aggies!)

I love her books because they're fun little mysteries with lots of recipes included.  They are based in Lake Eden, MN and center around Hannah Swensen, the main character, who is a baker and owner of The Cookie Jar.  If you've never read one, you should!

Anyway, I was intrigued by this recipe, and had to try it out.  Of course, I made a few minor adjustments to the original recipe, but it was so good (and easy) that I've made it lots of times since.  Besides with that beautiful Texas Aggie color, it's a sure hit with my family and me!


Gig’em (Red Velvet) Cookies

Ingredients
2 (1 oz.) squares unsweetened baking chocolate
1-1/2 cups all-purpose flour
1/2 cup whole wheat flour
1/2 teaspoon baking soda
1/4 teaspoon salt
1/2 cup (1 stick) butter, softened at room temperature - (NOT melted)
2/3 cup firmly packed brown sugar (I like to use Whey Low® Gold)
1/3 cup sugar (or your favorite sugar substitute)
1 large egg (or 1/4 cup egg substitute)
1 Tablespoon red food coloring (you can use a little less or a little more, depending on how deep you want your red color to be)
3/4 cup fat free sour cream (you can use regular sour cream or plain Greek yogurt if you prefer)
1 (6 oz.) pkg. (1 cup) miniature semi-sweet chocolate chips (the original recipe calls for regular chocolate chips, but I prefer the miniature ones)

Directions
Preheat oven to 375°F.
Line your cookie sheets with parchment paper, lightly sprayed with non-stick cooking spray.  (If you don’t have any parchment paper, don’t worry about it …just be sure to grease your cookie sheet, or spray it with non-stick cooking spray.)
Unwrap and separate the squares of chocolate, and put them into a small microwave-safe measuring cup.  (You can use a bowl, but since the measuring cup has a handle, it’s much easier to remove from the microwave when it’s hot!)  Melt the chocolate squares for 90 seconds on HIGH, then stir them until smooth and set them aside to cool.
Whisk together flours, salt and baking soda.  Set aside.
Using an electric mixer, combine the butter and sugars.  Beat at medium speed until smooth, then add the egg, and continue mixing until the batter is smooth again.  Add the red food coloring and mix until it is even distributed and not streaky (30 seconds or so).
Shut off the mixer and scrape down the bowl.  Add the melted chocolate and mix again for another minute on medium speed.
Shut off the mixer and scrape down the bowl again.  At low speed (to prevent a flour blizzard in your kitchen!), mix in about half of the flour mixture (about 1 cup).  When the flour is mixed in, add about half of the sour cream, and mix well.
Scrape down the bowl again and add the remaining flour mixture.  Beat until the flour is fully incorporated, then add in the rest of the sour cream.  Mix just until combined.
Remove the bowl from the mixer and mix in the chocolate chips by hand.  (I use a firm rubber spatula for this.)
Use a small cookie scoop or teaspoon to spoon the dough onto the parchment-lined cookie sheets.  (At this point the dough can be a bit sticky.  If you have trouble working with it, just put it in the refrigerator for about 30 minutes before scooping out your cookies.)  Bake the cookies at 375°F, for about 9 to 11 minutes (depending on your oven), or until they rise and become firm.  (If you like them more "cakey" take them out on the early end.  The longer you cook them, the more they'll dry out and become eventually become crisp.  They're good either way, but somewhere in the middle is my favorite.)
Slide the parchment from the cookie sheets and onto a wire rack (if you aren’t using parchment paper, let the cookies cool for about 2 minutes or so before removing from the pan to wire racks to cool).
Once all the cookies are cool, you can remove them from the parchment paper and put them on waxed paper for frosting.

Cream Cheese Frosting

1/4 cup (1/2 stick) butter, softened to room temperature (again, be sure to soften, but not MELT your butter)
4 ounces Neufchâtel cheese (or regular cream cheese), softened to room temperature
1/2 teaspoon vanilla extract
About 2 cups powdered (confectioners’) sugar

Using a hand mixer, mix the softened butter with the softened cream cheese and vanilla until the mixture is smooth.  (I’ve also done this in my food processor - which makes it very quick and easy.)  Add the powdered sugar (a little at a time) until the frosting is consistency you want for spreading.

These make delicious gifts too.  I have yet to find someone who could eat just one!

Give them a try and let me know what you think.

Oh...and BTHO outta Ole Miss this weekend Aggies!!
Blessings,
--Faithy