The discovery of a new dish does more for the happiness of mankind than the discovery of a star. -- Anthelme Brillat-Savarin --

Tuesday, October 22, 2013

Faithy’s Poppin’ Pepper Jelly

HOWDY friends!  How’s life in your neck of the woods today?  It’s a beautiful day here in Zig Zag!  I just love early fall.  The weather is wonderful, and now that we’ve had a bit of rain at last, the countryside is just gorgeous.  God is SOOOOOOOOO good!!

I had a bit of free time last week, so I decided to try some new jelly & jam recipes that I’ve been saving for such an opportunity.  I’ve made lots of jellies over the years, but for some reason (despite living in South Texas) I’ve never made jalapeño jelly.  I’ve sure eaten a lot of it though, and it’s one of my favorites.  I came across a recipe for Jalapeño Jelly posted by Cindy over at Hun…What’s for Dinner a few weeks ago, and her description “sold” me, so I decided to give her recipe a try.

It was very simple to make (the hardest part was getting the liquid pectin out of the packets, while trying to stir!), and came out beautiful.  The only real change I made to her recipe was adding some orange bell pepper - mostly for added color.  I ended up with about one cup of the combined bell peppers, and 1 cup of jalapeño peppers.  Next time, I think I’ll increase the jalapeño pepper a bit (to add just a bit more spiciness), and just use a total of 2 cups of mixed peppers.

Faithy’s Poppin’ Pepper Jelly

1 large red bell pepper, finely minced
1 large orange bell pepper, finely minced (you could also use a yellow one if you prefer…I personally don’t recommend using green ones, as I find their flavor too intrusive)
1 cup jalapeno pepper, finely minced
5 cups white sugar
1 1/2 cups apple cider vinegar
2 (3 oz) packets liquid pectin

Remove stems, veins and most of the seeds of the bell and jalapeno peppers.  (Be careful not to rub your eyes or face while doing this!  I usually wear powder-free surgical gloves when I work with hot peppers.)  Chop the peppers into very small pieces.  (I just used my food processor…quick & easy!)


Combine peppers, sugar and vinegar in a large stock pot.  Stir until thoroughly combined, and bring to a rolling boil.  Continue to boil for 3 minutes, then remove from heat and let cool for 5 minutes.


Stirring constantly (or as constantly as you can while squeezing the pectin into the mix), add the pectin, then let the mixture continue to cool for 2 minutes more.

Now stir for 1 minute, then ladle quickly into hot, sterilized jars, filling to within 1/8-inch of the tops.  (I generally scoop and pour my jelly using a 1 cup measure (Pyrex - NOT plastic!!) or a ceramic coffee mug with a sturdy handle.  It also helps a LOT if you have a canning funnel to help make sure the scalding hot liquid - my hubby calls it “napalm” - actually goes into the jars rather than all over you or your workspace!)  Wipe jar rims and threads with a clean cloth (not one that you’ve used for any other purpose!), and cover with sterilized lids.  Screw bands on firmly.

Had to save a bit for sampling!

Standard Water-Bath Method:  Place filled jars on an elevated rack designed to fit your canner.  Lower the rack gently into the water-filled canner.  (Remember, that the jars will displace some of the water, so don’t start out with water at the level you want it to end up at, or you’ll have a mess on your hands!  Don’t ask me how know this…LOL!)  NOTE:  Water must cover jars by 1 to 2 inches; if you’re a little short, add more to bring it to the correct level.  Cover; bring water to a gentle boil, and process for 10 minutes.  Remove jars and place upright on a towel to cool completely (at least 24 hours).

As the cooling process happens, the lids will begin to “pop” and let you know they are sealed.

After jars have cooled completely, check seals by pressing the middle of each lid with your finger.  (If you can pop the lid down, or if it springs back, IT IS NOT SEALED and refrigeration will be necessary.  If you end up with any don’t seal, just stick them in the fridge, and keep them there until you use them.  They’ll keep quite a while.  If you have quite a few that don’t seal, never fear…you can still go back and give them a water bath, to get that seal after all!)

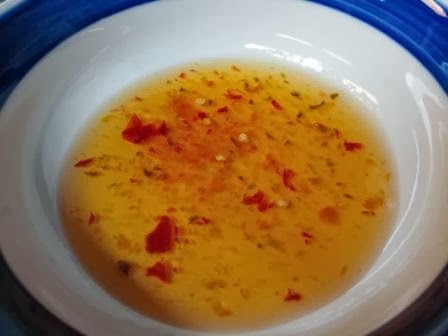
If you’ve never tried pepper jelly, you should really give it a try.  This jelly comes out really beautiful (my pictures just don’t do it justice), and is great for gift-giving.  I love serving it with fat-free cream cheese and crackers.  (You can just pour it over a block of cream cheese, or stir it into the cream cheese to make a pretty spread - just adjust the amounts of each to suit your taste.  If you blend it together in a food processor, it will incorporate a bit of air to make a lighter spread.)  It’s also delicious spread onto hot cheddar biscuits, or used as a glaze for chicken or pork, but there are lots of other uses too.  Just use your imagination…or follow this link for more ideas.

I hope to have some time to post some of my other recent jelly recipes soon.  So keep an eye out for them.  Meanwhile, enjoy this beautiful time of year, and take a few minutes each day to count your blessings.

Also, please do me a favor, and take a minute to post your favorite way to use pepper jelly, I’m always looking for new ideas…and drop me a line if you try this recipe.  I really want to know what you think.  Oh yeah...please be sure to stop by Hun…What’s for Dinner and tell Cindy thanks for the recipe, it's definitely a keeper!!

Blessings,
--Faithy

Sunday, October 20, 2013

Apple Chai Muffins


Howdy friends!  Happy “Son-day”!   I hope you and yours are well and happy, and enjoying this beautiful day that the Lord has made.  I know that I for one have been enjoying this cooler weather.  How ‘bout you?  We’ve even had rain in Zig Zag this past week, so things are green and the cows are happy too.
One of my favorite bloggers is Modern Mrs. Cleaver, and I came across this wonderful recipe for Apple Chai Muffins on her site a few weeks ago, and HAD TO give it a try.  I already had the tea in my pantry, because it’s one of my favorites, so I tested it the very first chance I had.  (I didn’t even wait until the weekend like I usually do!)  I liked it so much, that I’ve already made it a couple of times.  I even took some to work, and the truck drivers I work with were asking why I didn’t make more!  Give it a try and let me know what you think…and stop by and check out Modern Mrs. Cleaver’s website.  She’s got LOTS of great recipes that you won’t want to miss.

I made a few using small custard cups rather than muffin tins.  Look how tall & beautiful they turned out!

Apple Chai Muffins 

INGREDIENTS:

Chai Glaze
1/2 cup milk
2 chai tea bags (I used vanilla chai, like Modern Mrs. Cleaver recommended!)
1-1/2 cups powdered sugar
Batter - Dry Ingredients
1-1/2 cups all-purpose flour
1/2 cup whole wheat flour
1 cup sugar (or your favorite sugar substitute, I used Whey Low Type D)
3 teaspoons low-sodium baking powder (or regular baking powder)
1/4 teaspoon grated orange peel (I prefer fresh, but dried will do)
1-1/2 teaspoons ground cinnamon
1/2 teaspoon baking soda
1/4 teaspoon salt (the original recipe called for 1/2 tsp., but I almost always use half of the amount called for)
1/4 teaspoon ground cloves (I didn’t want the muffins too spicy, so I halved the amount of all the spices -- except the cinnamon)
1/4 teaspoon ground ginger
1/4 teaspoon ground allspice (the original recipe called for 1/2 teaspoon cardamom, but I didn’t have any on hand, this substitution worked well)

Batter - Wet Ingredients
    1/2 cup egg substitute (or 2 eggs)
1 cup fat free sour cream (I've also used plain non-fat Greek yogurt)
1/4 cup melted Smart Balance Butter Blend sticks (or real butter)
1 large apple (cored, peeled, and diced into small cubes -- I used the Granny Smith variety -- if your apples are small, use two!)
Streusel Topping
1/4 cup sugar (or sugar substitute)
2 tablespoons all-purpose flour
1 tablespoon whole wheat flour
1/4 teaspoon cinnamon
2 tablespoons cold butter

Directions:
Preheat the oven to 400°F and spray muffin cups with your favorite non-stick spray.
Prepare the chai glaze by heating milk in a saucepan until it is hot, and just starts to simmer…DON’T BOIL.  Remove from heat and add the tea bags.  Let them steep in the hot milk for about 10 minutes, stirring then around now and then to get as much of their flavor into the milk as possible.  Set aside for now, and start on the muffin batter.
Combine all of the dry ingredients in a large bowl, and whisk together until well blended.
In a separate bowl (or large measuring cup), whisk together the eggs, sour cream, and melted butter.
Pour the wet ingredients into the dry ingredients and stir until just blended.  Be careful not to stir too much, which will overwork the batter and give you tough muffins!  (NOTE:  This will be a thick batter.)  Stir in the diced apples and mix until combined.  Now just let the batter “rest” while you make the streusel topping.
Place the sugar, flour, and cinnamon into the bowl of your food processor and pulse until the mixture resembles coarse sand.  (You can also do this by hand…just cut the chilled butter into small cubes and using a fork or pastry cutter, “cut” the butter into the flour mixture until your get a crumbly texture.  Either way is fine, the food processor is just a bit faster!)

Fill greased muffin cups about 2/3 full.  I use a large cookie scoop (an ice cream scoop would work fine as well).  Sprinkle each muffin with a generous amount of the streusel topping.
Bake for about 18 to 20 minutes, or until muffins pass a “toothpick test”.
While the muffins are baking (and boy do they smell good!), you’ll need to finish preparing the glaze.  Using a 2-cup measuring cup (or a medium-sized bowl), simply whisk together the chai flavored milk and powdered sugar until it reaches a “drizzle” consistency.  Feel free to taste-test (just to make sure it’s good enough to serve of course).
Once the muffins are done, remove them from the oven and allow them to cool in the pan for 2 to 3 minutes before removing them to a cooking rack.  (NOTE:  Using a cooling rack allows the muffins to cool completely without the bottoms getting soggy.)  I like to put my cooling racks over a jelly roll pan (or any other pan with sides) so that I can glaze the muffins right over that without dirtying the counter.

While the muffins are still warm, spoon (or if you’re using the measuring cup for your glaze, you can even pour) a small amount of the chai glaze over top of each one.  (If you have glaze left over, don’t dump it!  I’m sure you can find another use for it!)
As I mentioned, I’ve made these several times now, and everyone who has tried them has given them a thumbs up!  Many thanks to Modern Mrs. Cleaver for the wonderful recipe!!  It’s definitely on my “favorites” list.
Enjoy your day my friends, and don’t forget to thank the Good Lord for giving it to you!
Blessings,
--Faithy

Monday, October 7, 2013

Gig’em (Red Velvet) Cookies

Now that football season is in full swing, I thought I'd share one of my favorite cookie recipes.    I found my base recipe years ago in a book called Carrot Cake Murder by Joanne Fluke.  She called them Red Velvet Cookies, but I like my name better.  (Hee, hee...just a little tribute to my Fightin' Texas Aggies!)

I love her books because they're fun little mysteries with lots of recipes included.  They are based in Lake Eden, MN and center around Hannah Swensen, the main character, who is a baker and owner of The Cookie Jar.  If you've never read one, you should!

Anyway, I was intrigued by this recipe, and had to try it out.  Of course, I made a few minor adjustments to the original recipe, but it was so good (and easy) that I've made it lots of times since.  Besides with that beautiful Texas Aggie color, it's a sure hit with my family and me!


Gig’em (Red Velvet) Cookies

Ingredients
2 (1 oz.) squares unsweetened baking chocolate
1-1/2 cups all-purpose flour
1/2 cup whole wheat flour
1/2 teaspoon baking soda
1/4 teaspoon salt
1/2 cup (1 stick) butter, softened at room temperature - (NOT melted)
2/3 cup firmly packed brown sugar (I like to use Whey Low® Gold)
1/3 cup sugar (or your favorite sugar substitute)
1 large egg (or 1/4 cup egg substitute)
1 Tablespoon red food coloring (you can use a little less or a little more, depending on how deep you want your red color to be)
3/4 cup fat free sour cream (you can use regular sour cream or plain Greek yogurt if you prefer)
1 (6 oz.) pkg. (1 cup) miniature semi-sweet chocolate chips (the original recipe calls for regular chocolate chips, but I prefer the miniature ones)

Directions
Preheat oven to 375°F.
Line your cookie sheets with parchment paper, lightly sprayed with non-stick cooking spray.  (If you don’t have any parchment paper, don’t worry about it …just be sure to grease your cookie sheet, or spray it with non-stick cooking spray.)
Unwrap and separate the squares of chocolate, and put them into a small microwave-safe measuring cup.  (You can use a bowl, but since the measuring cup has a handle, it’s much easier to remove from the microwave when it’s hot!)  Melt the chocolate squares for 90 seconds on HIGH, then stir them until smooth and set them aside to cool.
Whisk together flours, salt and baking soda.  Set aside.
Using an electric mixer, combine the butter and sugars.  Beat at medium speed until smooth, then add the egg, and continue mixing until the batter is smooth again.  Add the red food coloring and mix until it is even distributed and not streaky (30 seconds or so).
Shut off the mixer and scrape down the bowl.  Add the melted chocolate and mix again for another minute on medium speed.
Shut off the mixer and scrape down the bowl again.  At low speed (to prevent a flour blizzard in your kitchen!), mix in about half of the flour mixture (about 1 cup).  When the flour is mixed in, add about half of the sour cream, and mix well.
Scrape down the bowl again and add the remaining flour mixture.  Beat until the flour is fully incorporated, then add in the rest of the sour cream.  Mix just until combined.
Remove the bowl from the mixer and mix in the chocolate chips by hand.  (I use a firm rubber spatula for this.)
Use a small cookie scoop or teaspoon to spoon the dough onto the parchment-lined cookie sheets.  (At this point the dough can be a bit sticky.  If you have trouble working with it, just put it in the refrigerator for about 30 minutes before scooping out your cookies.)  Bake the cookies at 375°F, for about 9 to 11 minutes (depending on your oven), or until they rise and become firm.  (If you like them more "cakey" take them out on the early end.  The longer you cook them, the more they'll dry out and become eventually become crisp.  They're good either way, but somewhere in the middle is my favorite.)
Slide the parchment from the cookie sheets and onto a wire rack (if you aren’t using parchment paper, let the cookies cool for about 2 minutes or so before removing from the pan to wire racks to cool).
Once all the cookies are cool, you can remove them from the parchment paper and put them on waxed paper for frosting.

Cream Cheese Frosting

1/4 cup (1/2 stick) butter, softened to room temperature (again, be sure to soften, but not MELT your butter)
4 ounces Neufchâtel cheese (or regular cream cheese), softened to room temperature
1/2 teaspoon vanilla extract
About 2 cups powdered (confectioners’) sugar

Using a hand mixer, mix the softened butter with the softened cream cheese and vanilla until the mixture is smooth.  (I’ve also done this in my food processor - which makes it very quick and easy.)  Add the powdered sugar (a little at a time) until the frosting is consistency you want for spreading.

These make delicious gifts too.  I have yet to find someone who could eat just one!

Give them a try and let me know what you think.

Oh...and BTHO outta Ole Miss this weekend Aggies!!
Blessings,
--Faithy