Pages

Wednesday, August 31, 2011

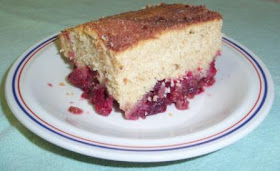
Cranberry Coffee Cake

God is in His heaven -- all’s right with the world. -- Robert Browning --

Happy Wednesday friends!!

I made this over the weekend, and it sure was good.  Thought you might want to give it a try.

I originally got this recipe from Taste of Home , but never made it.  I came across a printed copy the other day, and decided to give it a try.  Can’t just have these recipes sitting around for no reason!  :-)

As usual, I’ve made it my own…feel free to use my version or theirs, but try it.  You’ll be glad you did!


Cranberry Coffee Cake

3 cups fresh or frozen cranberries (I used frozen and they worked fine)
1/2 cup chopped pecans (the original recipe called for more, but I was running low - this amount was actually just right)
1 cup sugar, divided into two 1/2 cup portions
1 cup Smart Sugar, divided into two 1/2 cup portions
1-1/2 Smart Balance buttery sticks (3/4 cup), softened
3/4 cup HEB Real Egg (or 3 whole eggs, lightly beaten - if you prefer)
1 teaspoon vanilla extract
1 cup all-purpose flour
1/2 cup whole wheat flour
1 teaspoon sodium free baking powder
1/4 teaspoon salt

TOPPING:
1 Tablespoon sugar
1/2 teaspoon ground cinnamon

Combine cranberries, pecans and 1/2 cup of each of the sugars in a small bowl.  Mix well and pour into greased 9x9” square baking pan.

Cream butter and remaining sugars.  Add eggs and vanilla; mix well.

Combine flours, baking powder and salt.  Add to creamed mixture and mix well.

Drop batter by large spoonfuls over the cranberry mixture; carefully spread to cover completely.

Combine topping ingredients and sprinkle over batter.

Bake at 350° for 50 to 60 minutes or until it passes the “toothpick test”.

Makes 8 to 10 servings.

This keeps well for leftovers another day, but I think it’s best served fresh & warm.  Mmmmmmm…

I am the Lord thy God, which brought thee out of the land of Egypt:
open thy mouth wide, and I will fill it. -- Psalm 81:10 --
Monday, August 29, 2011

For those of you who enjoy canning (or want to give it a try)...

Didn't have time to post this weekend, but I thought I'd take a second to share a couple of wonderful resources I came across in the blogosphere lately... http://www.foodinjars.com/  and http://chickensintheroad.com/cooking/

Whether you're an experienced canner or a newbie, these blogs are for you!

Can't wait to try out some of the stuff I've found there.

Check it out, and let me know if it's helpful for you!

Blessings,
--Faithy

Sunday, August 21, 2011

Sunday Scones...

Spent some time reading through another “new” cookbook this weekend, and came across a yummy sounding recipe for scones. I L-O-V-E scones…so I thought I’d try it out.

The cookbook is Southern Living: Homestyle Cooking - © 2002 by Oxmoor House, Inc. As is typical for any Southern Living cookbook, it’s got lots of delicious recipes I want to try. You’ll probably see a few more as we go along.

If you ever come across this cookbook, you can find this particular recipe on page 111, in the Breads, Breakfasts & Brunches chapter under Quick Breads. The one you see here has been adapted to fit my cooking style (as usual) and what was in my cupboard when I made it. J


Dried Cherry & Cream Scones

1-1/2 cups all purpose flour (the original recipe uses only all-purpose flour - your scones will be lighter and fluffier if you go that route, but I love the nutty flavor and extra color the whole wheat flour gives - not to mention the nutritional boost.)
1/2 cup whole wheat flour
1 Tablespoon sodium free baking powder
1/4 teaspoon salt
1/4 cup sugar
3/4 cup dried cherries
1 Tablespoon grated lemon rind
1-1/4 cups whipping cream
NOTE:  I was out of whipping cream so I found a substitute online (3/4 cup skim milk, 1/3 cup butter, 1 Tbsp. flour & 1/8 tsp. vanilla - mixed together and heated until thickened, then cooled before use) and used that.  It would have been better with the real thing, but it was still very good!
1 Tablespoons unsalted butter, melted
2 Tablespoons sugar
1 teaspoon grated lemon rind

Pulse the first 4 ingredients in your food processor until well mixed.  Add the cherries and 1 Tbsp. lemon rind.  Pulse until the cherries are coarsely chopped.  Add whipping cream and pulse just until the mixture starts to hold together.

The original recipe calls for chopping the cherries and mixing everything by hand.  That works fine, but I’ve gotten spoiled to just letting my food processor do the work.  It’s MUCH faster and easier for those of us with arthritis in our hands.

Turn dough out onto a lightly floured surface and knead lightly 4 or 5 times, just until dough holds together.  (I love this part….kneading dough is just so relaxing and homey!  Don’t get carried away though, this needs VERY little kneading.)

On an ungreased baking sheet, pat dough into an 8” circle.  Cut dough into 8 wedges, and separate wedges slightly.  Brush with melted butter.  Combine 2 Tbsp. sugar and 1 tsp. lemon rind, and sprinkle over dough.

Next time I think I’ll just roll out the dough and cut it with cookie/biscuit cutters instead.  This way is quicker, but I just prefer my scones the other way.  I also think I’ll make them a little thicker than the 8” circle allowed.

Bake at 400° for approx. 23 minutes or until golden brown.  Remove from pan and serve warm or cool on wire racks.

This recipe makes 8 good sized scones.


These scones were really good!  In my opinion, the topping was the “secret ingredient” that put them over the top!  I’m going to remember that simple topping and try it on other things…maybe a pie or cobbler.  Mmmmm…

Can’t wait to try these again - with real whipping cream this time!

Hope you’re having a wonderful Lord’s day my friends.  Don’t forget to take a minute and thank Him for all the wonderful things He provides…

Blessings,
--Faithy

Saturday, August 20, 2011

Berrylicious bounty...

Another beautiful (although still excessively D-R-Y in Zig Zag) Saturday morning....

I was going to spend the early morning hours pulling weeds in my flower beds, but allergies are working against me today.  However, choosing to look at the “up” side of things…being stuck inside did give me time to make a yummy breakfast this morning!

I found another newspaper clipping in my inherited stuff that sounded good, so I thought I’d test it out.  When I mentioned pancakes, my husband was a little wary, after that last experiment with the pumpkin pancakes (hee, hee), but at least he was willing to give ‘em a try.

I think they turned out really good, but dear hubby really likes plain old fluffy white pancakes best, so he voted good, but not great.  I myself love hearty whole-grain stuff, both for taste and the extra health benefits - so we switch back and forth.

(NOTE:  these pancakes are very filling so you won’t eat as many as you might with regular pancakes - if you do, you’ll probably regret it later.  J )

I also have another whole-grain pancake recipe that I’ve been making for years.  I’ll have to post that one sometime too.  I personally like it a little better than this one, but my hubby liked this one better because of the fruit.

Anyway…enough of the rambling and on to the recipe(as usual, it’s been adapted to use my regular substitution ingredients, but you can make it using the regular stuff if you prefer.  I didn’t change the flour this time though.  The original recipe called for all whole wheat flour, so I left that alone for a change.)


Berrylicious Whole-Grain Pancakes

1 cup whole-wheat flour
1/2 cup uncooked oats (I use old-fashioned, but the quick oats will work too)
1 Tablespoon Smart Sugar (regular sugar will work fine)
1 Tablespoon sodium-free baking powder
1/8 teaspoon salt
1-1/3 cups skim milk (this recipe actually called for skim milk, so I didn’t need to substitute it!)
1/4 cup HEB Real Eggs (or 1 regular egg, beaten)
2 Tablespoons canola oil
1/2 cup dried cranberries (roughly chopped)
1-1/2 cups blueberries (I used frozen, but the original recipe called for fresh ones)

In a large bowl, combine flour, oats, Smart Sugar, baking powder and salt; mix well.  In medium bowl, combine milk, Real Egg and canola oil; blend well.  Add to dry ingredients all at once; mix just until dry ingredients are moistened.  Gently stir in cranberries.

Heat nonstick griddle or skillet over medium-high heat.  Lightly grease or spray with nonstick cooking spray.

Pour approximately 1/4 cup batter onto hot griddle (I use a large cookie scoop - but a 1/4 cup dry measure or an ice cream scoop would work too); quickly top with blueberries (the original recipe called for 8 to 10 blueberries per pancake, but I only used 5 or 6 each).  


Turn pancake when edges look cooked.  Cook second side; remove from griddle and serve immediately.


The original recipe included a recipe for a berry topping to go with these, so I’ll include that for you too.  I just used some seedless blackberry preserves on mine.  SOOOOOOOO good!!

TOPPING INGREDIENTS:
1 (10-ounce) jar blueberry OR blackberry fruit spread
1 Tablespoon lemon juice

Heat fruit spread and lemon juice over high heat until melted and hot.  Stir occasionally as it is heating.  (You could do this on the stovetop or in the microwave.)  Spoon over pancakes.

Well, I’m off to try and be productive this afternoon.  Have a WONDERFUL day my friends…
--Faithy

Sunday, August 14, 2011

Mango munchies...

Hello my friends,
Hope this beautiful Sunday evening finds you well and happy.  Another busy weekend comes to a close as I sit here at my computer watching a glorious sunset out my window.  God’s artistry never fails to amaze and inspire me!

I got this weekend’s recipe from a newspaper clipping found amidst all my inherited recipes and cookbooks.  I thought it sounded good, so I pulled it out to try for Saturday morning’s breakfast.  The flavors were wonderful, but the dough was excessively dry.  Now I’m trying to figure out what I could add to help it out a bit.

Ideas anyone???  I was thinking maybe some buttermilk...or possibly sour cream.  What do YOU think? I decided to share the recipe anyway (with my usual substitutions), in case someone else may have some ideas on how to tweak it.  The mango-blueberry combination was really good, so I really want to fix this.


Mango-Blueberry Muffins

½ cup shortening (next time I think I’ll try using butter)
½ cup Smart Sugar
¼ cup sugar
½ cup HEB Real Eggs (or 2 large eggs)
1½ cups all purpose flour
½ cup whole wheat flour
1 teaspoon baking soda
1/8 teaspoon salt
2/3 cup finely chopped fresh mango
1/3 cup fresh blueberries (these were not in the original recipe, but I tossed ‘em in because I had some that needed to be used, and it sounded good!)
1 Tablespoon fresh lime juice
¼ cup chopped pecans (I halved what the original recipe called for)

Cream shortening and sugar thoroughly.  Add Real Eggs.  Stir in flours, baking soda and salt.  Add mango, blueberries and lime juice.  Mix well.  Add nuts.

Pour batter into greased muffin tins and bake in preheated 375°F oven for 20 to 25 minutes or until they pass the “toothpick test”.

The original recipe was actually for a 9x5x3” loaf (which would cook for about an hour at the same temperature).  If you make the bread, be sure to cool it completely before slicing.

Blessings…
--Faithy
I lie down and sleep; I wake again, because the Lord sustains me. -- Psalm 3:5 --

Sunday, August 7, 2011

Old friends and favorite recipes...

Howdy!  I certainly hope everyone is enjoying a blessed Lord’s Day today!  I know I am.

A busy week behind, and another ahead, but I’m grateful for it all.

Haven’t had much time to cook this weekend, but I wanted to share an “oldie but goodie” recipe I came across while sorting through a stack of recipes this afternoon.  Haven’t made this in a while, but I think I should pull it out again.  I got it from a dear friend (thanks Addie Ruth!) who let me live in her home for a summer during my college days.  I’ve made it countless times since then…even had a variation of it at my wedding.  Give it a try next time you need something quick, easy and delicious for your family - or a potluck dinner.  It’s sure to please!

I think of this precious lady every time I make it…treasured memories…one of the many things I love about “hand-me-down” cooking.

Chicken Enchilada Casserole
Ingredients:
1-1/2 lbs. chicken breast (you can use canned chicken if necessary, but home-cooked is better)
2 cans reduced salt/reduced fat cream of chicken soup
1 cup fat free sour cream
1-1/2 tsp. minced onion
1 (4 oz.) can green chilis (or 2 cans if you like it spicy)
1 dozen corn tortillas, torn into small pieces
1 cup grated sharp cheddar cheese
Boil chicken and remove any bones, cut into bite-sized pieces.  In sauce pan, heat soup, sour cream, onion, and chilis for 5 minutes (DO NOT BOIL), stir in chicken.  Layer chicken-soup mixture, tortillas and cheese in a 13” x 9” x 2” baking dish, starting with soup mixture and ending with cheese on top.
Bake at 350° F until hot and bubbly.

(Addie Ruth’s original recipe was for regular chicken enchiladas.  I adapted it into a casserole for days when I’m in a hurry.)

To make the enchiladas, just soften the whole tortillas in a little oil and drain on paper towels.  Next, fill each tortilla with chicken, a little sauce and some cheese, then roll them up and place them in your baking dish.  Top with the remaining sauce and cheese, then bake until hot and bubbly.  The casserole version is a bit faster to put together, but both are yummy!)

Blessings,
--Faithy